
| 일 | 월 | 화 | 수 | 목 | 금 | 토 |
|---|---|---|---|---|---|---|
| 1 | 2 | 3 | 4 | 5 | 6 | 7 |
| 8 | 9 | 10 | 11 | 12 | 13 | 14 |
| 15 | 16 | 17 | 18 | 19 | 20 | 21 |
| 22 | 23 | 24 | 25 | 26 | 27 | 28 |
| 29 | 30 |
- 클론
- 데이터베이스
- Python
- run sql script
- 따옴표 삭제
- 에러
- PHPStorm
- error 해결
- visualstudio code
- error
- DataGrip
- cmd
- 깃 토큰
- localhost
- csv
- console창
- php
- github token
- jupyter
- clone
- Visual Studio Code
- github clone
- 오류
- vscode
- 파이썬
- database
- import data
- 단축키
- MySQL
- OrCAD 다운로드
- Today
- Total
개발 노트
13주차 본문
1. tomcat 설치
Apache Tomcat® - Apache Tomcat 8 Software Downloads
Apache Tomcat® - Apache Tomcat 8 Software Downloads
Welcome to the Apache Tomcat® 8.x software download page. This page provides download links for obtaining the latest versions of Tomcat 8.x software, as well as links to the archives of older releases. Unsure which version you need? Specification versions
tomcat.apache.org
8.5.66 버전 설치
32-bit/64-bit Windows Service Installer
선택
2. tomcat 폴더 > bin > tomcat8w.exe 실행 > start >localhost:8080 접속 확인
3. D:\program\tomcat\conf > context.xml 수정 >
<Context/> 바로 뒤에 추가
<Resource name="jdbc/stockmarket" auth="Container"
              type="javax.sql.DataSource" driverClassName="oracle.jdbc.OracleDriver"
              url="jdbc:oracle:thin:@127.0.0.1:1521:"
              username="c##scott" password="tiger" maxTotal="20" maxIdle="10"
              <!-- 동시접속자 : 20, 서버 최대 개수 10개-->
              maxWaitMillis="-1"/>
4. D:\program\tomcat\webapps > root파일을 복사한 뒤 이름을 stockmarket으로 수정
index.jsp에서 %는 자바를 의미, %=는 자바코드의 결과 출력
5. stockmarket 폴더 안의 WEB-INF 폴더를 제외한 나머지를 전부 지움
6. WEB-INF 폴더 안의 wed.xml 파일 수정
</web-app> 바로 위에 코드 추가
 <resource-ref>
     <description>Oracle Datasource example</description>
     <res-ref-name>jdbc/stockmarket</res-ref-name>
     <res-type>javax.sql.DataSource</res-type>
     <res-auth>Container</res-auth>
  </resource-ref>
7. WEB-INF 폴더 안에 classes 폴더 생성하여 13주차 classes파일 붙여넣기
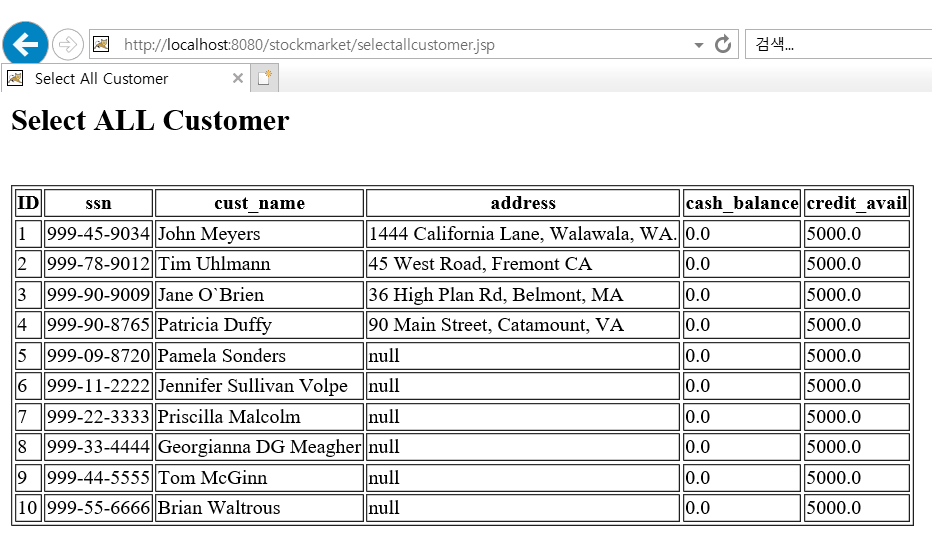
8. webapps > stockmarket 폴더 안에 selectallcustomer.jsp 파일 작성
<%@ page import="java.sql.*, javax.naming.*, javax.sql.*, java.util.*" %>

<jsp:useBean id="handler" class="knu.mypackage.StockMarketJDBCHandler" scope="page"/>

<html>
  <head>
    <title>Select All Customer</title>
  </head>
  <body>

  <h2>Select ALL Customer</h2>

<TABLE border=1>
<tr>
<th>ID</th>
<th>ssn</th>
<th>cust_name</th>
<th>address</th>
<th>cash_balance</th>
<th>credit_avail</th>
</tr>
<%
			Vector<knu.mypackage.Customer> vec = handler.getAllCustomers();

			for (int i = 0; i < vec.size(); i++) {
				knu.mypackage.Customer cust = (knu.mypackage.Customer) vec.elementAt(i);
		%>
		<tr>
			<td><%=cust.getID()%></td>
			<td><%=cust.getSsn()%></td>
			<td><%=cust.getCust_name()%></td>
			<td><%=cust.getAddress()%></td>
			<td><%=cust.getCash_balance()%></td>
			<td><%=cust.getCredit_avail()%></td>
		</tr>
		<%
			}
		%>
		<br />
	</TABLE>

  </body>
</html>
tr부터 /tr은 테이블의 한 줄
t%부터 는 소스코드
for문 안에 있는 td는 출력
9. cmd 창에서
D:
D:\program\tomcat\webapps\stockmarket\WEB-INF\classes
D:\program\tomcat\webapps\stockmarket\WEB-INF\classes>dir
D:\program\tomcat\webapps\stockmarket\WEB-INF\classes>javac -d . *.java
실행
10. ojdbc8을 tomcat 폴더 > lib 에 복사
11. cmd창에서 D:\program\tomcat\bin>startup.bat
12. 인터넷 창에서 localhost:8080/stockmarket/selectallcustomer.jsp 접속하여 캡쳐
*에러가 날 경우
1) tomcat(bin 파일 안에 있음) stop
2) tomcat>work 폴더 아래 내용들 삭제
3) tomcat start
**만약 버전에러가 나면 jdk 8버전 설치 필요
**그 전 stockmarket.sql을 다운받아서 테이블 데이터 sql입력 필요
<getcustomer>
1. tomcat > webapps > stockmarket에 getcustomer.html를 생성
<form name=forml action="getCustomer.jsp" method="post">
SSN: <input type="text" name="ssn"><br>
<input type="submit"> <input type="reset">
</form>
2. getcustomer.jsp 생성
<%@ page import="java.sql.*, javax.naming.*, javax.sql.*, java.util.*" %>

<jsp:useBean id="handler" class="knu.mypackage.StockMarketJDBCHandler" scope="page"/>

<html>
  <head>
    <title>StockMarket</title>
  </head>
  <body>

  <h2>Get A Customer</h2>
<%
  String ssn = request.getParameter("ssn");
  out.print(ssn);
%>
<BR>
<%=ssn%>

<TABLE border=1>
<tr>
<th>ID</th>
<th>ssn</th>
<th>cust_name</th>
<th>address</th>
<th>cash_balance</th>
<th>credit_avail</th>
</tr>
<%
  knu.mypackage.Customer cust = handler.getCustomer(ssn);
		%>
		<tr>
			<td><%=cust.getID()%></td>
			<td><%=cust.getSsn()%></td>
			<td><%=cust.getCust_name()%></td>
			<td><%=cust.getAddress()%></td>
			<td><%=cust.getCash_balance()%></td>
			<td><%=cust.getCredit_avail()%></td>
		</tr>
	</TABLE>

  </body>
</html>
*참고
<%= 출력내용 %>
out.print(출력내용)
<BR>은 엔터한뒤 출력
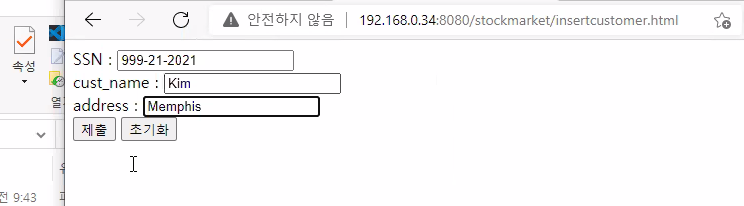
<insertcustomer>
1. insertcustomer.html 생성
<form name=form1 action="insertcustomer.jsp" method="post">
SSN : <input type="text" name="ssn"><br>
cust_name : <input type="text" name="cust_name"><br>
address : <input type="text" name="address"><br>

<input type="submit">  <input type="reset">
</form>
2. insertcustomer.jsp 생성
<%@ page import="java.sql.*, javax.naming.*, javax.sql.*, java.util.*" %>

<jsp:useBean id="handler" class="knu.mypackage.StockMarketJDBCHandler" scope="page"/>

<html>
  <head>
    <title>StockMarket</title>
  </head>
  <body>

  <h2>Insert A Customer</h2>
<%
  String ssn = request.getParameter("ssn");
  String cust_name = request.getParameter("cust_name");
  String address = request.getParameter("address");
  //out.print(ssn);

//addCustomer (String name, String ssn, String addr)
  handler.addCustomer (cust_name, ssn, address);
%>

  </body>
</html>
3. 실행방법
출력결과: 21번에 insert가 된 것 확인 가능

**tomcat 창 두개 띄우는 법

'학부 공부 : 21.03.02~06.20 > 데이터베이스 이론 및 실습' 카테고리의 다른 글
| 코드 수정사항 (0) | 2021.06.14 |
|---|---|
| 14주차 강의 (0) | 2021.06.07 |
| 12주차 (0) | 2021.05.29 |
| 5/17 11주차 (0) | 2021.05.17 |
| 5/10 10주차 (0) | 2021.05.17 |


